Tattoo Styles
Color Realism
Every honest prediction about this style is really a prediction about sun exposure. Layered pigment reads photographic on day one; whether it still does at year twelve comes down to placement, sunscreen habit, and whether you actually book the touch-up.
Book a consultationLayering
Photographic color, defined.
Photographic rendering in full-spectrum pigment. Built in layers, constrained by physics, preserved by stewardship.
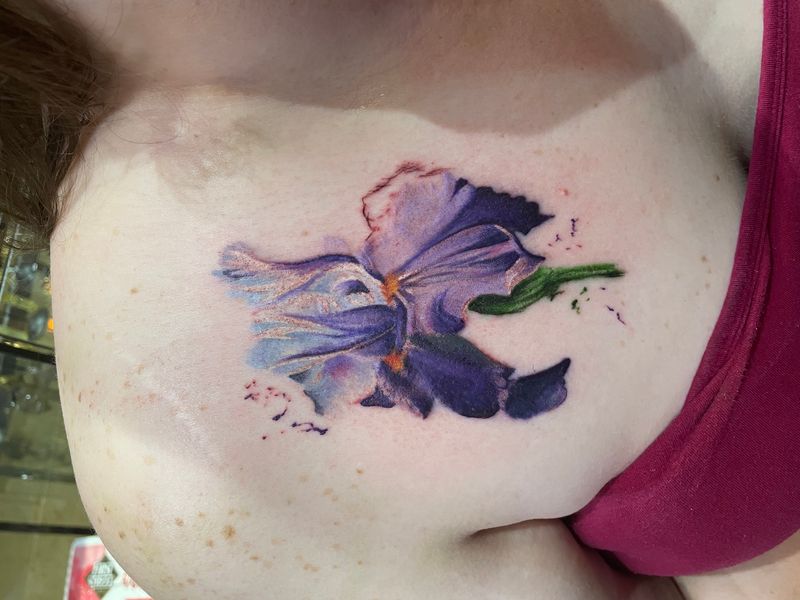
Color realism is a tattoo discipline that renders photographic imagery using the full pigment spectrum. Skin tones, fur textures, petal gradients, sunset atmospherics, iridescent feathers — all resolved in saturated color that reads as convincingly three-dimensional on skin.
The style is the most vivid tattoo style available and the most maintenance-intensive. That tradeoff defines the entire category. A color realism tattoo is judged not by how expressive it feels but by how convincingly it resolves into its reference — and by how long the saturation holds.
The maintenance variables are real: yellows fade first, reds warm and dull, blues cool and grey down, whites can yellow or disappear. The image shifts in temperature as one pigment family outlasts another. Artists plan for this by designing compositions that still read once the color palette compresses.
Who built it
Who built the modern color voice.
Color realism is a young tradition — barely 40 years old at tattoo scale. Its masters are identifiable and largely still working.
1990s – 2000s
Paul Booth & Bob Tyrrell
Paul Booth built a reputation in dark realism and horror imagery, proving realism could carry weight, atmosphere, and narrative even in muted palettes. Bob Tyrrell worked mostly in black-and-grey but codified portrait craft and smooth tonal blending that color artists would later inherit.
2000s – 2010s
Mike DeVries & Nikko Hurtado
Mike DeVries pushed nature realism forward, showing wildlife and animal portraits could hold photographic texture under color. Nikko Hurtado was the breakthrough voice — film-character portraits rendered in warm, saturated, cinematic color demonstrated that skin tones and lighting could be reproduced convincingly in ink.
2010s
Cecil Porter & the painterly turn
Cecil Porter brought a painterly surrealism to the conversation, blending realism with stylized color logic. The lineage expanded from strict photorealism to include compositions that borrowed from oil painting and digital illustration.
2015 – present
Modern specialists
A generation of specialists now works inside this lineage — some anchored in portraiture, some in wildlife, some in fantasy. Ink chemistry has improved, cartridge systems have standardized equipment, and the base of working color realists has widened. The craft is alive and refining.
What remains constant is the commitment: color realism is a partnership between artist and client that extends across decades. The artist delivers the initial masterpiece; the client preserves it through sun protection, touch-up commitment, and careful placement choices. Without both halves, the piece degrades faster than the lineage intended.
Technique
Four moves that define the craft.
The discipline stack behind every strong color realism piece.
Ι
Built in layers
Artists rarely lay a color down once and move on. Instead they pack a base tone, return with shadow modulations, glaze in complementary accents, and finish with highlight passes — sometimes across multiple sessions to let skin settle between layers. Depth a single flat pass cannot reproduce.
ΙΙ
Color theory is the engine
Realistic skin is almost never a single flesh tone; it carries red in the cheeks and lips, olive or cool tones in shadow, warm yellows in highlight, and violet or blue-grey in the deepest recesses. Complementary accents make rendered surfaces read as three-dimensional rather than painted-on.
ΙΙΙ
Saturation is unforgiving
Color must be packed densely enough to survive the healing process, which strips a meaningful percentage of pigment as skin sloughs and regenerates. Pack too lightly and the piece heals pale; pack too aggressively and the skin scars or blows out the fine edges.
ΙV
UV behavior compounds everything
Reds and yellows are the most fugitive colors under sunlight; blues and greens tend to hold longer. Modern ink lines have narrowed the gap, but the physics haven't vanished. Sun exposure is a maintenance conversation at the consultation, not an afterthought.
Sun and size
Where color realism lives.
The placement conversation is the sun protection conversation. These are the zones that hold color longest.
Placement against sun exposure
- Inner bicep / upper arm (best). Minimal daily sun exposure allows reds, yellows, and oranges to retain saturation for decades rather than years. The inner bicep is the single most protected zone on the arm.
- Upper back (best). Gold standard for large-scale color work. Offers both protection and uninterrupted canvas space. Back panels are where serious color compositions live.
- Chest (best). Typically covered in professional settings and well-protected from direct UV. Natural fit for larger portrait or floral color work.
- Thigh (best). Covered by most clothing, generous flat canvas, minimal friction. Apollo clients frequently choose thigh for first color investments.
- Calf (moderate). Covered in pants, visible in shorts. Manageable UV exposure for clients willing to commit to sunscreen discipline during summer months.
- Hands, face, neck (avoid). Aggressive daily sunlight will accelerate fade by 2–3x. Fingers and ribs also present additional challenges through friction and stretching. The sun protection conversation IS the placement conversation for color realism.
How large before detail survives
- Under 4 inches. Color complexity cannot resolve at small scale. Gradient transitions turn muddy, skin tones read as flat, and the piece ages faster than larger equivalents. Discouraged for portraits entirely.
- 4–7 inches. Workable floor for saturated single-subject color work — a rose bouquet, a butterfly, a tropical bird portrait. Not enough canvas for a full color portrait.
- 7–12 inches. Where color realism lives. Full portraits, narrative wildlife pieces, complex botanical compositions. Multi-session territory for most subjects.
- 12+ inches. Back panels, sleeves, thigh plates. The scale color realism was engineered for — enough room for environmental context, multiple subjects, or complex figurative scenes.
Compositions in color
Eight compositions that sing in color.
Each one tested against the medium's realities — sun exposure, touch-up cadence, skin-tone calibration.
1. Color portrait (realistic face)
The pinnacle of color realism. Full skin-tone portrait capturing subtle blush, warm undertones, and the cool greens of shadow areas beneath the eyes. Typically commemorative. Requires 8–10 inches minimum for the face alone, placed on upper arm, thigh, or back panel.
2. Red rose bouquet
The motif color realism keeps coming back to. Deep crimson petals with burgundy shadows and highlight blush tones run the full red spectrum. Green leaves provide complementary contrast. Upper arm or shoulder at 6–10 inches.
3. Lion or tiger face in color
Big cat portraiture in full color reveals the warm oranges, deep golds, and subtle pinks within feline fur. The mane offers dramatic texture play; piercing amber eyes become the focal point. Thigh and upper back at 10–12 inches.
4. Parrot or tropical bird
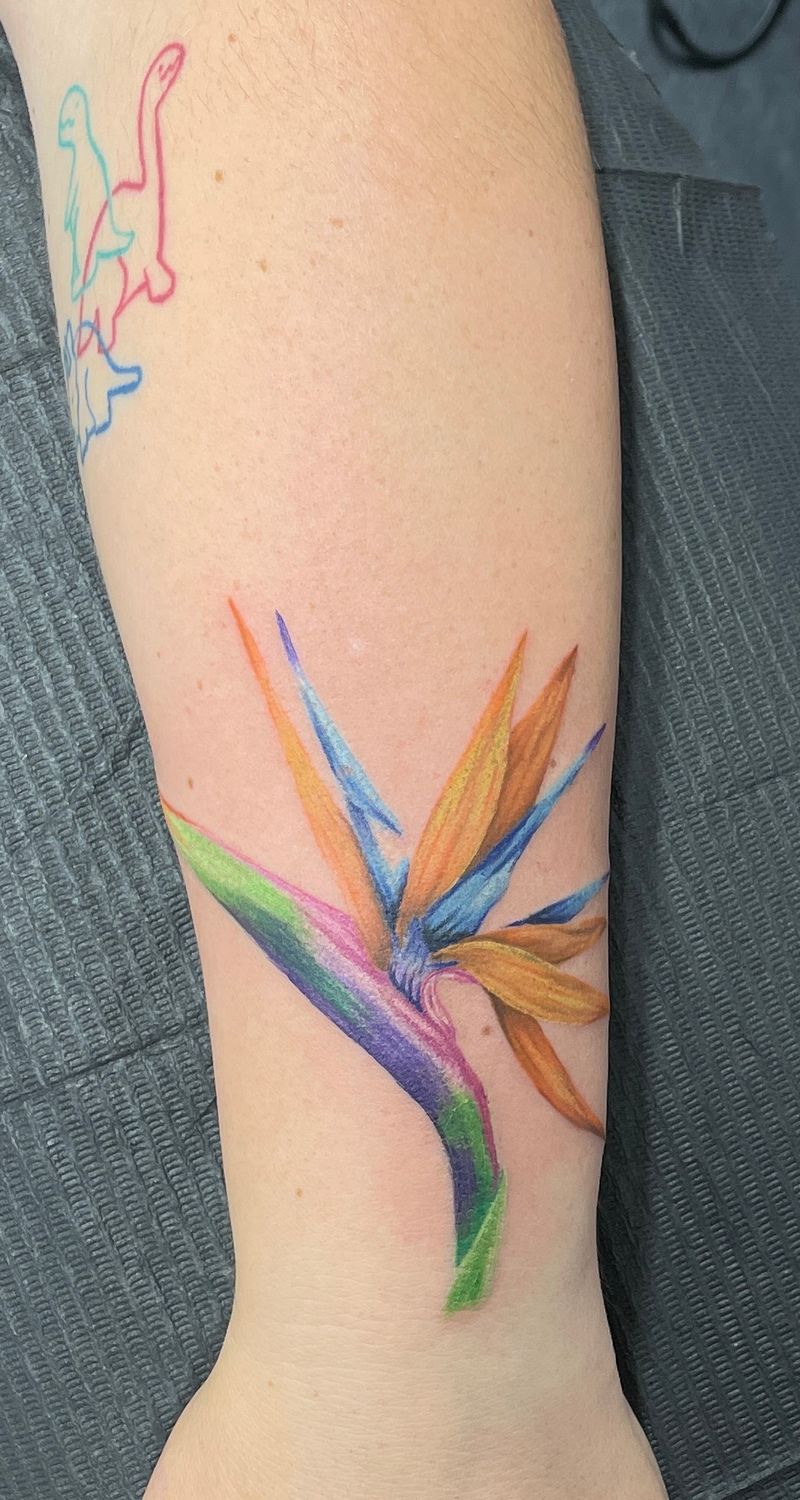
Macaws, scarlet tanagers, or toucans let the full color wheel breathe on skin. Feather-by-feather color transitions create mesmerizing detail. These pieces photograph extraordinarily well. Forearm inner, upper arm, or calf at 7–9 inches.
5. Koi fish with water
Classic Japanese-inflected koi takes on realism dimensions through rippling water reflections, scale iridescence, and flowing fin gradients. Orange, white, and black koi varieties each offer unique color studies. Thigh, ribs, or upper arm.
6. Peacock feather
A single oversized peacock feather captures iridescent teals, emerald greens, royal blues, and bronze eye-spots. The linear design suits forearm, spine, or outer thigh at 8–12 inches. Universally wearable, requiring careful blue pigment selection for longevity.
7. Tropical flower
Bird of paradise, hibiscus, protea, or plumeria carry the high-chroma botanical vocabulary of a coastal climate. Orange-to-yellow gradients on bird of paradise or pink-to-coral hibiscus show color realism at its softest. Shoulder, thigh, or ribs at 5–8 inches.
8. Santa Monica sunset landscape
Santa Monica's famous sunsets translate to skin through warm oranges, pinks, purples, and deep blues gradient work. Pier silhouettes, palm trees, or ocean horizons add narrative anchoring. Back panel, thigh, or outer arm at 10–14 inches.
Blending
Blending photographic color into other work.
Pairings that extend lifespan, add hierarchy, and counterpoint saturation.
Pairing
Color realism + illustrative borders
Framing a realistic color portrait with bold illustrative linework creates visual hierarchy and protects the realism core from reading as floating. Decorative frames, botanical borders, or geometric surrounds anchor the piece.
Pairing
Color realism + watercolor accents
Splash effects behind a realistic subject add energy and artistic flair without compromising the photographic quality. Watercolor trails, paint drips, or color bursts suggest the subject emerging from abstract expression.
Pairing
Color realism + neo-traditional framing
Combining realism portraiture with neo-traditional banners, ribbons, roses, or decorative elements bridges classical tattoo vocabulary with modern rendering. Neo-traditional elements age beautifully alongside realism.
Pairing
Color realism + black-and-gray contrast
Color focal point against a black-and-gray background extends the piece's lifespan. The monochrome elements anchor when color areas soften with age.
Pairing
Color realism + animal portrait
The natural home for wildlife realism. A color lion, tiger, or tropical bird rendered with portrait-level fidelity sits firmly inside both traditions.
Aging & longevity
How color holds over time.
Color ages on a steeper curve than black-and-gray. Knowing the timeline keeps expectations honest.
Year 1–3: Settling.
Fresh saturation reads brighter than the healed piece will. Once the dermis fully heals, pigment settles into its long-term tone. This is the settling window, not a fade.
Year 3–5: First compression.
Yellows and light pastels soften first. Highlights may need early refresh. This is the window when sun exposure habits start showing in the piece.
Year 5–8: First meaningful touch-up.
Most well-maintained color pieces see their first real touch-up here. Refreshing highlights, saturating reds, recompressing shadow depth. Part of ownership, not a flaw.
Year 10+: The maintenance rhythm.
Every 8–10 years after the first touch-up, another refresh. Clients who keep up the cadence watch their color pieces hold for decades. Clients who skip touch-ups watch them degrade exponentially.
First color piece
Eight preparations worth making.
The preparation that separates color clients who love their pieces at year ten from clients who regret them.
- Pick a protected placement. Inner bicep, upper back, thigh, chest. These zones let color hold saturation for decades instead of years.
- Start medium-sized. Palm-sized color work teaches you how the medium ages on your skin without the stakes of a full portrait or sleeve.
- Commit to sun protection. Daily SPF 50+ on the healed piece is part of owning a color tattoo. Non-negotiable.
- Pick a proven ink brand. Ask what your artist uses. Established brands with consistent pigment quality age predictably; budget inks fade unevenly.
- Accept the session count. Color work runs longer than black-and-gray. Budget 2–3 sessions for mid-sized pieces, more for full portraits.
- Bring high-quality reference. 2000+ pixel photos, directional light, sharp focus. Your artist can only render what the source shows.
- Plan the touch-up cadence. Year 5–7 is the first refresh window. Budget it from the start.
- Ask about skin-tone calibration. The artist's palette should adjust for your specific complexion. Generic mixing produces flat results.
Your choices
Three choices only you can make.
Color realism personalization is about palette, context, and framing.
Palette choice
Saturated jewel tones read strongest on darker skin; muted pastels and flesh tones suit lighter complexions. A specialist calibrates the palette to the client.
Environmental context
A rose alone is a flower. A rose inside a Santa Monica sunset is a piece of place. Environmental elements anchor the subject in a specific story.
Composition framing
Illustrative borders, neo-traditional banners, or watercolor accents create hierarchy and protect the color focal point as it ages.
Expectations we reset
Six expectations we reset.
The failure modes specific to color realism, and the conversations that prevent them.
Skipping sun protection
The single largest cause of premature color tattoo aging. SPF 50+ applied daily is non-negotiable for vivid longevity. Tanning beds and unprotected beach days can destroy years of saturation in weeks.
Wrong placement for sun exposure
Hands, feet, fingers, and heavily sun-exposed areas age color fastest. First-time color clients should avoid these zones, opting for inner biceps, thighs, or upper back for their debut pieces.
Not planning for touch-ups
Budget for lifetime maintenance before committing. Clients who cannot afford every-decade refreshers should reconsider color realism entirely or choose smaller pieces.
Bad reference photos
Low-resolution, poorly-lit, or compositionally weak references produce disappointing tattoos regardless of artist skill. Invest in quality references or professional photography for portrait work.
Rushing the design
Color realism requires extensive consultation, reference gathering, and often multiple design revisions. Booking aggressively or pushing artists to finalize quickly produces regrettable results.
Choosing color when black-and-gray serves better
Some subjects — mood pieces, sculptural realism, memorial portraits — actually read stronger in black-and-gray. A specialist will tell you when color is working against the concept.
Long-haul questions
Eight things to ask about the long haul.
A color realism specialist has a specific answer to each.
- Can I see healed color pieces photographed at the 5- and 10-year mark?
- Which ink brand do you use and why?
- How do you custom-mix colors for skin-tone accuracy?
- What's your SPF protocol for the healed piece?
- How many sessions will this take, and what's between them?
- How does color behave on my specific skin tone?
- What's your touch-up policy and cadence?
- Have you ever talked a client out of color for a specific placement?
Vague answers on ink brand, skin-tone calibration, or touch-up cadence are telling you something. Color is a partnership.
FAQ
The long-horizon questions about color realism.
What people ask once they understand this is a maintenance relationship rather than a single appointment.
How does color realism age compared to black-and-gray?
Color realism ages faster than black-and-gray, full stop. B&G pieces often look crisp at 15 years with minimal intervention; color realism typically needs its first touch-up at years 5–8 to restore saturation. Sun exposure accelerates this by 2–3x. Well-maintained color work ages beautifully, but it requires active stewardship rather than passive ownership.
Which colors fade fastest?
Yellows and light pastels fade first, usually within 3–5 years of moderate sun exposure. Reds and oranges follow, while blues and greens hold longest. White highlights often yellow or disappear entirely within a decade. Black outlines and shadows remain most stable. Artists plan around this by using saturated base colors and building highlights last, knowing they'll refresh first.
How often do I need touch-ups?
Plan for a first touch-up at year 5–7, then every 8–10 years afterward for vivid maintenance. Clients who religiously apply SPF 50+ and avoid tanning can stretch intervals to 10–12 years. Placement matters enormously: forearms and calves need more frequent attention than inner biceps or thighs.
How is pricing handled for color realism?
We quote color realism at consultation. Color demands longer sessions because ink saturation requires multiple passes, colors must be mixed and matched on the fly, and reference matching takes careful attention. Factor in lifetime touch-up costs. You're paying for both the initial artistry and ongoing maintenance partnership.
How does color realism look on darker skin?
Color realism works on darker skin tones, but artists must adjust their approach fundamentally. Pastels and light yellows often get muted by melanin, so specialists lean into saturated jewel tones, deep reds, and high-contrast compositions. A test patch during consultation is standard practice. The finest color realists have portfolios showing work across the skin tone spectrum.
Can I convert black-and-gray to color later?
Sometimes, depending on the original piece's density and style. Adding color to existing B&G typically works best when the base piece was designed with that possibility in mind, or uses lighter gray washes. Heavy black-and-gray portraits resist color conversion without full cover-up. Consult the original artist when possible.
What's the best first color realism piece?
Start with something medium-sized — palm to hand-sized — in a placement with minimal sun exposure like the inner bicep or upper thigh. Floral subjects teach clients how color behaves and ages without the emotional stakes of portrait work. Avoid fingers, feet, and heavily sun-exposed areas for first pieces.
Do color tattoos hurt more?
Color work generally involves more pain than equivalent B&G pieces, simply because sessions run longer and require multiple ink passes over the same area. The needles and techniques are similar, but saturation building means repeat trauma to already-irritated skin. Most clients report the last 45 minutes of a color session being notably harder than a comparable B&G session ending.
How long does a color portrait take?
A palm-sized color portrait typically requires 6–10 hours across 2–3 sessions. Full sleeves with portrait elements can run 40–80 hours total. Color realism cannot be rushed without sacrificing quality, so expect your artist to space sessions 3–4 weeks apart for proper healing. Face portraits demand the most time due to skin tone complexity and feature accuracy requirements.
What happens if I skip the touch-up?
Skipping the first touch-up accelerates degradation exponentially. Faded areas collect more UV damage, saturation drops continue compounding, and eventually restoration becomes cover-up territory. A piece that could have been refreshed with 2–3 hours at year 6 might need 8+ hours of reconstruction at year 12. Touch-ups are maintenance, not optional cosmetic upgrades.
Ready to talk color?
Bring the reference, the placement, and the commitment — we'll talk through the timeline.
Color realism is a partnership across decades. Bring high-resolution reference, the placement you're considering, and an honest conversation about sun exposure and touch-up commitment. Then we agree the maintenance terms out loud: the sun exposure you actually get, and when the first touch-up goes into the calendar.